Enabling JavaScript
JavaScript is disabled in a WebView by default. You can enable it through the WebSettings attached to your WebView. You can retrieve WebSettings with getSettings(), then enable JavaScript with setJavaScriptEnabled().
WebView myWebView = (WebView) findViewById(R.id.webview);
WebSettings webSettings = myWebView.getSettings();
webSettings.setJavaScriptEnabled(true);
Binding JavaScript code to Android code
public class WebAppInterface {
    Context mContext;

    /** Instantiate the interface and set the context */
    WebAppInterface(Context c) {
        mContext = c;
    }

    /** Show a toast from the web page */
    @JavascriptInterface
    public void showToast(String toast) {
        Toast.makeText(mContext, toast, Toast.LENGTH_SHORT).show();
    }
}
Bind class Android
WebView webView = (WebView) findViewById(R.id.webview);
webView.addJavascriptInterface(new WebAppInterface(this), "Android");
Coding in javascript
<a href="javascript:void(0)" onclick="showAndroidToast('Hello Android!')">Click for android</a>
<script type="text/javascript">
function showAndroidToast(toast) {
    if (typeof Android=="object") Android.showToast(toast);
    else console.log("App not run on Android")
}
</script>
ที่มา Building Web Apps in WebView
Update for MacOS : @2021-08-24
วิธีติดตั้ง
วิธีที่ 1 : ผ่าน BrewInstall
ลองแล้ว ผ่าน แต่จะติดตรง "Meld.app" cannot be opened because the developer cannot be verified.
ติดตั้ง brew cask
ruby -e "$(curl -fsSL https://raw.githubusercontent.com/Homebrew/install/master/install)" < /dev/null 2> /dev/null ; brew install caskroom/cask/brew-cask 2> /dev/null
ติดตั้ง meld
brew install --cask meld
วิธีแก้ไข "Meld.app" cannot be opened because the developer cannot be verified. จาก Open a Mac app from an unidentified developer ให้เปิดโปรแกรมโดยกดปุ่ม CTRL+Click บน icon app (แนะนำให้ใช้ Finder) แล้วคลิกขวา เลือก "Open"
ที่มา Install Meld for OSX on Mac OSX – Brew Cask – Big Sur, Mojave, Catalina, High Sierra, Capitan
วิธีที่ 2 : ติดตั้งจากไฟล์ .dmg โดยตรง
- Download and Install Yousseb fork for Mac https://yousseb.github.io/meld/.
- Create a meld file somewhere on my path, with code from comment by Levsa (pasted bellow) https://techtldr.com/how-to-run-meld-on-mac-os-x-yosemite-without-homebrew-macports-or-think/#comment-50195
- Make sure the file is still executable
sudo chmod a+x ~/bin/meld
ที่มา How To Run Meld on Mac OS X Yosemite Without Homebrew, MacPorts, or Think
วิธีที่ 3 : ติดตั้งผ่าน MacPorts
ซับซ้อนพอสมควร ยังไม่ได้ลอง
ที่มา : Installing MacPorts
สำหรับการติดตั้งใน Mac OSX รุ่นเก่า
หลังจากพยายามติดตั้ง Meld บน Mac OSX High Sierra มาหลายรอบ และไม่เคยสำเร็จสักที แม้กระทั่งพยามยามลง Ubuntu บน OSX ก็ยอม ก็เจอปัญหาหน้าจอถูกจำกัดอยู่ที่ 800x600 ซะนี่
แต่ว่า..... ในที่สุดก็ต้องขอขอบคุณ ผู้มีพระคุณที่ Github ที่ช่วยทำ OSX dmg file ให้ติดตั้งได้โดยง่ายยยยยยยย
ช้าอยู่ใย ดาวน์โหลดเลย และติดตั้งเลย
Update : 2020-10-03 หลังจากติดตั้งเสร็จ เมื่อเปิดใช้ครั้งแรก จะแสดง developer not verify ให้เปิด System Preference / Security & Privacy / General แล้วคลิก Aloow apps ด้วย
Update : 2018-10-01 ต.ค. 2018 Upgrade Mac OSX เป็น Mojave เกิดปัญหาเปิด Meld ไม่ได้ มีแต่ icon แต่ไม่มีหน้าต่างโผล่มา
เขาบอกว่าให้ run Bash script _clean-meld-settings.sh เพื่อคลีน settings ของ Meld
Please try to run the following Bash script _clean-meld-settings.sh to cleanup your some settings of Meld.
#!/bin/bash

cd ${HOME}
rm -rf ./.local/share/meld
rm -f ./Library/Preferences/org.gnome.meld.plist
rm -rf "./Library/Saved Application State/org.gnome.meld.savedState/"
OK WORK!!!!!
ที่มา Meld for OSX
ต้องการให้สร้างลำดับของ sorder ของข้อมูลในกลุ่มที่มีค่า tpid เดียวกัน โดยเริ่มนับ sorder จาก 1 เป็นต้นไป และเริ่มนับ 1 ใหม่เมื่อเปลี่ยนค่า tpid
SET @f := null, @i = null;
UPDATE `jobtr`
SET
    sorder = IF(tpid = @f, @i := @i+1, @i := 1),
    tpid = (@f := tpid)
ORDER BY tpid, sorder, jobtrid;
หากไม่ต้องเริ่มต้น group
SET @i = 0; UPDATEusersSET uid = @i := @i+1 ORDER BYuidASC;
วันนี้อ่านข่าว ช่องโหว่ใน Apache Struts 2 เปิดทางรันโค้ดจากระยะไกล มีการโจมตีแล้ว แล้วลองมาเช็ค Apache บน production host พบว่ายังเป็น version 2.2 อยู่ ก็เลยลอง upgrade
เริ่มแรกด้วยการตรวจสอบรุ่นของ Apache ก่อน link
On Debian and Mac OS:
apachectl -v
On Red Hat and Amazon's EC2 Linux use:
httpd -v
On other verisons of Linux try:
apache2 -v
You can use two different flags:
-v # gives you the version number
-V # gives you the compile settings including version number.
If you want to run the command with the full directory like user3786265 did but don't know where your apache is located, use the whereis command:
whereis httpd
ที่ server ใช้ Directadmin ก็ใช้ DirectAdmin build
cd /usr/local/DirectAdmin/custombuild<br />
./build set apache_ver 2.4
./build update
./build clean
./build apache n
./build php n
service httpd restart
ผลปรากฏว่า start Apache ไม่ได้ ล่มทั้ง server เนื่องจากใช้ suPHP อยู่ด้วย
รีบหาข้อมูลโดยเร็ว ทำอย่างไรดี โทรศัพท์เริ่มกริ๊งกร๊างเข้ามาแล้ว......
ที่แรก คือ Updating Apache to the latest version
ที่ต่อมา คือ Invalid command 'suPHP_Engine'
ที่สำคัญคือ build suphp และ rewrite_confs
cd /usr/local/directadmin/custombuild
./build update
./build clean
./build php y
./build suphp y
./build rewrite_confs
เหตุที่เกิดปัญหา เนื่องจาก ไม่ได้ build suphp ของ Apache 2.4 ทำให้ start Apache ไม่ได้ และเมื่อ build suphp เสร็จแล้ว จะต้องสร้าง config ใหม่ด้วย build rewrite_confs
รอดตามไปอีกครั้งหนึ่ง ชีวิตนี้มีลุ้นทุกครั้งที่ต้องอัพเกรด server
เข้าสู่ยุค https จึงจำต้องทำเสียแล้ว
มาลองติดตั้ง Let's Encrypt บน Directadmin กันอีกสักรอบ
1. เริ่มด้วยการแก้ไข config ของ Directadmin ให้สามารถใช้งาน Let's Encrypt ก่อน
nano /usr/local/directadmin/conf/directadmin.conf
สำหรับใครที่ใช้ path : /var/www/html/.well-known (ใช้โดเมนเดียว) ให้เพิ่ม
enable_ssl_sni=1
letsencrypt=1
ส่วนใครที่ใช้ path : /home/user/domains/domain.com/public_html/.well-known (ใช้หลายโดเมน) ให้เพิ่ม
enable_ssl_sni=1
letsencrypt=2
หรือจะสั่งผ่าน Terminal ก็ได้โดย
echo enable_ssl_sni=1 >> /usr/local/directadmin/conf/directadmin.conf
echo letsencrypt=2 >> /usr/local/directadmin/conf/directadmin.conf
แล้วสั่ง update config โดย
cd /usr/local/directadmin/custombuild
./build update
./build rewrite_confs
2. แล้วมาเพิ่ม Let's Encrypt ให้กับแต่ละเว็บ
กำหนดให้เว็บสามารถใช้งาน Secure SSL ก่อน
แล้วจึงไปเพิ่ม SSL Certificates ให้กับเว็บ โดยเลือก Free & automatic certificate from Let's Encrypt
(ต้องทำทั้ง www และ ไม่มี www)
ถ้าต้องการให้สามารถใช้งานได้ทั้ง https และ http ให้สร้าง link private _ html ให้ชี้ไปที่ public _ html ด้วยคำสั่ง
ln -s public _ html private _ html
แต่ถ้าต้องการให้ใช้งานเฉพาะ https อย่างเดียว ให้ rename public _ html ไปเป็น private _ html แล้วสร้าง folder public _ html ใหม่ และสร้างไฟล์ .htaccess โดยเพิ่มคำสั่ง
RewriteCond %{HTTPS} off
RewriteRule (.*) https://%{HTTP_HOST}%{REQUEST_URI}
Let's Encrypt ก็จะเป็นของเรา
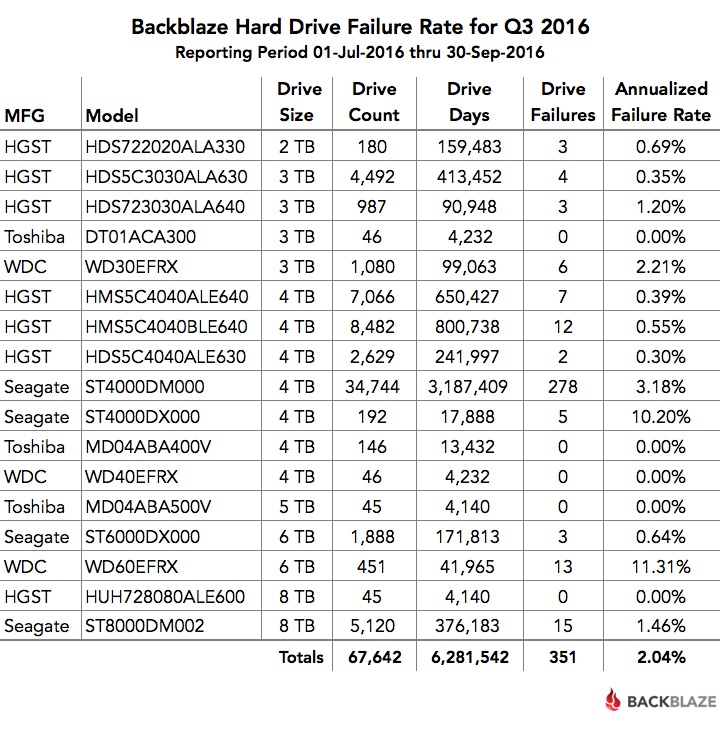
เก็บไว้เป็นข้อมูลในวันที่ต้องซื้อ harddisk ตัวใหม่ ว่าจะเลือกซื้อยี่ห้อไหนดี
ขอบคุณภาพจาก www.blognone.com จากเรื่อง Backblaze รายงานน่าเชื่อถือฮาร์ดดิสก์ไตรมาส 3 ซีเกต 8TB ทำความน่าเชื่อถือได้ดี
top :: the Linux Top Command
top
iotop :: I/O Monitor
iotop
iftop :: Bandwidth Monitor
iftop
iptstate : IP Tables State
iptstate
df :: Display Free Disk Space
df
กลับมาใช้ Shift-ALT ในการเปลี่ยนภาษา
ดาวน์โหลดโปรแกรม Karabiner A powerful and stable keyboard customizer for OS X. มาติดตั้ง แล้วเลือก Change Key > For PC User > Use PC Style "Change Input Source" #1 อ่านรายละเอียดเพิ่มเติม
ชีวิตหวนกลับมาหา Linux : Ubuntu อีกครั้งหลังส่ง MacBook ไปเข้าโรงซ่อมเป็นครั้งที่ 2 พร้อมกับการรอคอยการกลับมาอีกประมาณ 3 สัปดาห์ (รวมความแล้ว 1 ปีกว่า ๆ ไม่ได้ใช้งานเครื่องเกือบ 2 เดือน)
จึงต้องหวนกลับมาหาคำสั่ง Linux อีกครั้ง
แต่ชีวิตก็มีความสุขดี
Spec คร่าว ๆ
- Core i7
- RAM 16GB
- SSD 512GB - 1TB
- Display 4K
- Weight < 1.3 kg
ตัวแรก Lenovo Y700 15 นิ้วรุ่นท็อป ราคา 56,900 บาท

ตัวที่สอง Lenovo เปิดตัว Yoga 910 พร้อมขอบจอสุดบางและ Yoga Tab 3 Plus แท็บเล็ตตั้งได้

ตัวที่สาม DELL XPS 13

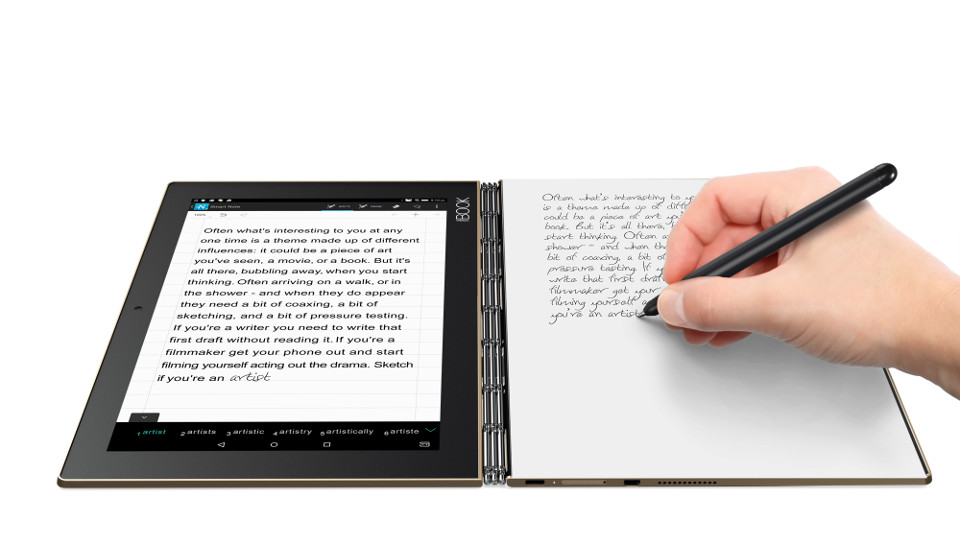
อันนี้แถม เหตุเพราะน่าใช้ดีจัง
Lenovo Yoga Book แท็บเล็ตพับได้ เขียนได้สองฝั่ง เขียนบนกระดาษจริงแล้วภาพขึ้นจอด้วย

ตัวต่อไป DELL Precision M5510 Standard SET
ชอบ Dell แต่ติดที่จอแค่ Full HD ไม่ใช่จอ 4K
