Pure White Color
#FFFFFF
#FFFFF0
#FCFCF7
#F2F8FC
#FAF9F6
#F4F1F8
#F0F8FF
#FBF5DF
#F8F7F4
#FDFDFD
Gray Color
#000000
#171717
#0C0C0C
#0B1215
#101720
#0D1717
#020D19
#011222
#21242A
#161110
#101923
#08100C
#23262A
#01A2228
#232325
เริ่มศึกษา ภาษา Go
ตารางที่เกี่ยวข้อง
- tag : taggroup => project:supportType, catId
- glcode : glcode
- project_gl : glcode
- project_dev : category
- project : supportType is value
- project_tr : formId="info", part="project",
refCodeis value
Backup database
Backup database all table
mysqldump --user=username --password databasename> file.sql
Backup database some table
mysqldump --user=username --password databasename table1 table2 > file.sql
Backup database exclude some table
mysqldump --user=username --password --databases db --ignore-table=db.table1 --ignore-table=db.table2 > file.sql
Repair database/table
For InnoDB Tables:
- Restart MariaDB with innodbforcerecovery by edit MariaDB configuration file (e.g., my.cnf or my.ini) and add or modify the innodbforcerecovery option in the [mysqld] section. Start with a low non-zero value (e.g., 1).
- Restart MariaDB. If it fails, increase the value and retry.
- Once MariaDB starts, you can try to dump the data from the corrupted table, drop the table, recreate it, and then restore the dumped data.
- Check and Optimize Tables: - Use mariadb-check -c databasename to check for corrupted indexes. - Run OPTIMIZE TABLE tablename to force a rebuild of the table.
For MyISAM Tables:
Use REPAIR TABLE statement:
REPAIR TABLE table_name;
You can add the FORCE argument to attempt internal repair before rebuilding:
REPAIR TABLE table_name FORCE;
Use myisamchk utility:
myisamchk -r table_name.MYI
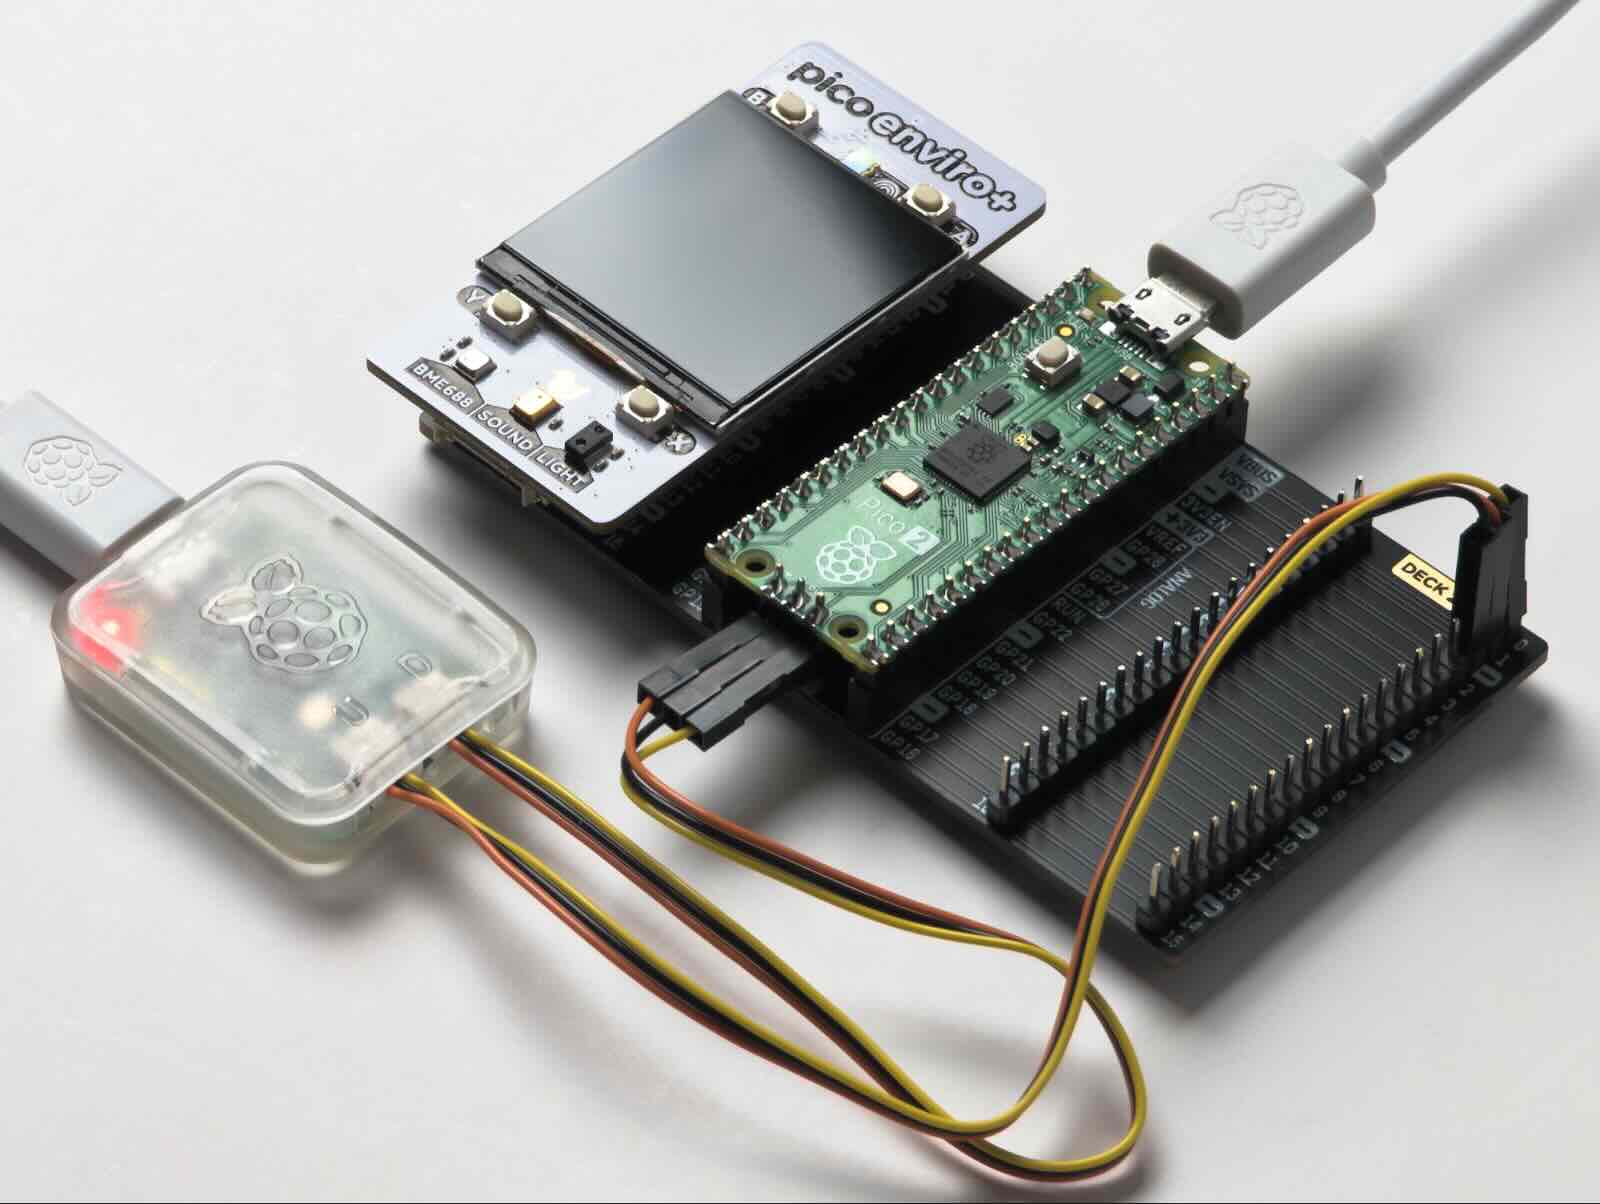
เจอข่าวจาก blognone.com ว่า "กูเกิลเปิดตัว Pigweed SDK ชุดพัฒนาคอมพิวเตอร์ embedded เต็มรูปแบบ รองรับ RP2350" กะว่าจะลองดูสักหน่อย
อ่านเอกสารแนะนำได้จาก Introducing the Pigweed SDK: A modern embedded development suite
เริ่มต้นด้วยการ Clone Sense showcase repo และลองติดตั้งจาก tutorial
ไว้หาโอกาสลองใช้งานอีกที แล้วค่อยมารายงานเพิมเติม
/var/log/apache2/error.log
[Sun Jul 07 14:36:12.269017 2024] [mpm_prefork:error] [pid 3153653:tid 3153653] AH00161: server reached MaxRequestWorkers setting, consider raising the MaxRequestWorkers setting
/var/log/php7.4-fpm.log
- [07-Jul-2024 00:00:01] NOTICE: error log file re-opened
- [07-Jul-2024 13:15:25] WARNING: [pool www] server reached pm.max_children setting (5), consider raising it
nano /etc/php/7.4/fpm/pool.d/www.conf
change
pm.max_children = 5
to
pm.max_children = 20
nano /etc/apache2/mods-enabled/mpm_prefork.conf
<IfModule mpm_prefork_module>
    #StartServers       10
    MinSpareServers       10
    MaxSpareServers      20
    #MaxRequestWorkers    150
    #MaxConnectionsPerChild   0

    ServerLimit              250
    StartServers              10
    #MinSpareThreads           75
    #MaxSpareThreads          250<br />
    #ThreadLimit               64
    #ThreadsPerChild           32
    MaxRequestWorkers       250
    MaxConnectionsPerChild 10000
</IfModule>
กลับมาเริ่มเขียน IoT ใหม่อีกครั้ง หลังจากทิ้งไปนาน
NodeMcu
Additional Boards Manager URLs
Board: esp8266http://arduino.esp8266.com/stable/packageesp8266comindex.json
Select board: NodeMCU 1.0
Port: dev/cu.usbserial-21110
ESP-32
Additional Boards Manager URLs
Board: esp32 by Espressifhttps://dl.espressif.com/dl/packageesp32index.json (สำรอง)https://espressif.github.io/arduino-esp32/packageesp32index.json (สำรอง)https://raw.githubusercontent.com/espressif/arduino-esp32/gh-pages/packageesp32index.json
Select board: ESP32-WROOM-DA Module or ESP32 Dev Port: dev/cu.usbserial-0001
Upload speed: 460800 (***** ระวัง ความเร็ว 921600 ใช้งานไม่ได้ อัพโหลดโปรแกรมแล้วเกิดข้อผิดพลาด *****)
Resource:
มีโจทย์ว่าต้องการเพิ่ม user ใน Ubuntu แต่จำกัดไม่ให้เปลี่ยน folder หรือ ไม่ให้เข้าถึงบาง folder ซึ่งตามปกติบน Linux จะจัดการสิทธิได้ 3 ระดับ คือ เจ้าของ/กลุ่ม/คนอื่นๆ โดยไม่สามารถจัดการเฉพาะ user ได้
จึงจำเป็นต้องใช้โปรแกรมสำหรับจัดการสิทธิเพิ่มเติม ในที่นี้จะใช้ setfacl : set file access control lists - Linux
1.ยกเลิกการเข้าถึง folder
setfacl -m user:username:--- folder/
2.อื่น ประมาณเช่น
setfacl -R -m g:username:rwx /home/user1/domains/xxx.com/folder/
setfacl -m u:username:--x /home/user1/domains/xxx.com/
setfacl -R -x user:username /home/user1/domains/xxx.com/folder/
setfacl -m u:username:--x /home/user1/domains
setfacl -m u:username:--x /home/user1
3.ขอดูสิทธิ
getfacl folder